There are SO many blog posts about installing a Kubernetes cluster on Raspberry Pi, I didn’t want to be left out.
I have been playing around with Kubernetes for a couple months now. I have setup MiniKube and OpenShift on a Single Fedora Node that runs on a Mac Mini. I’ve taken the Certified Kubernetes Administrator course on Linux Academy, which sets up a small cluster, and I have just finished The Linux Academy course Kubernetes the Hard Way, which follows Kelsey Hightower’s paper Kubernetes The Hard Way. This course was fantastic, and I highly recommend it if you really want to learn about how Kubernetes is put together. Up until taking this course, every tutorial or class I had taken used kubeadm, ansible scripts, or some other script that was a wrapper around one of those. Kubernetes the hard way really showed me what all these scripts were doing, and the building blocks of how kubernetes is put together.
So I have decided it will be a good project to put together a Raspberry Pi cluster following Kubernetes The Hardway setup. I will publish a series of posts documenting this installation.
The Setup
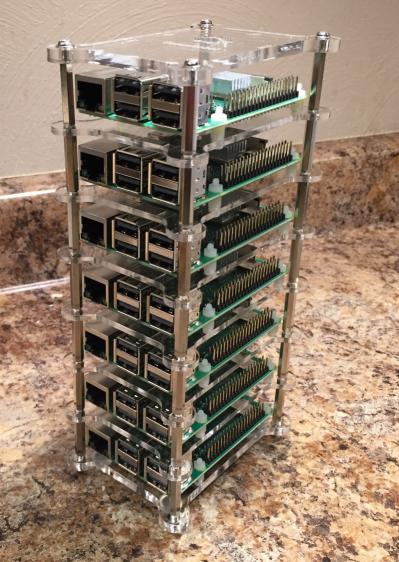
I have 7 Raspberry Pi 3 B+, a 8-port NetGear Gigabit switch, a GeauxRobot 7 layer Dogbone Pi rack, and 7 Samsung 32GB mini SD Cards.
The plan is to build 3 Master Controllers, 3 Worker Nodes, and 1 Load Balancer Node running nginx. Each Master will run etcd, kube-apiserver, kube-scheduler, and kube-controller-manager. The Nodes will run a kubelet, kube-proxy, kube-dns, and use docker as the container platform. This is a bit of a change from Kubernetes the hard way, since that used containerd as the container platform. However, that is one of the things I learned that interested me the most. In Kubernetes, it is possible to switch out some of these building blocks, and I’m interested in figuring out how that is done.

Provisioning the Raspberry Pi’s
- Download the Raspbian Lite image and flash it to an SD Card. I use Etcher.io to flash the cards, but there are plenty of other applications and ways to accomplish this.
- After flashing the SD Card, run
touch sshin the boot partition to enable SSHD, to be able to run the servers in a headless mode. - If you don’t have a ssh key, run
ssh-keygenand follow the instructions on screen to generate one - Next, in the rootfs of the SD card, run
$ mkdir home/pi/.ssh
$ cat ~/.ssh/id_rsa.pub > home/pi/.ssh/authorized_keys
$ chmod 600 home/pi/.ssh/authorized_keys
- Unmount the SD Card, put it in the Pi and boot.
- There are a number of ways to figure out the IP of your Pi, i.e. login to your router/DHCP server, and a number of scanning tools. I prefer to use nmap.
$ nmap -p 22 192.168.1.0/24

Nmap scan report for raspberrypi.local (192.168.1.26)
Host is up (0.0037s latency).
- SSH into your Pi with the user pi
ssh pi@192.168.1.26
If you setup your sshkey properly, you will not be prompted for a password.
-
Run
sudo raspi-configIn Network Options, change the hostname to “k8s-master-1.k8s.daveevans.us”, and in Advanced Options expand the root filesystem. Then Reboot. When it comes back up you should now be able tossh pi@k8s-master-1.k8s.daveevans.us -
Setup a second virtual interface to create a private network between the Raspberry Pi’s. These will be the addresses used in all the configurations of the cluster.
$ sudo vi /etc/network/interfaces

auto eth0
allow-hotplug eth0
iface eth0 inet dhcp

auto eth0:1
allow-hotplug eth0:1
iface eth0:1 inet static
  address 10.0.0.10
  netmask 255.255.255.0
  gateway 10.0.0.1
- Turn off swap
$ sudo dphys-swapfile swapoff && \
$ sudo dphys-swapfile uninstall && \
$ sudo update-rc.d dphys-swapfile remove
- change the boot parameters
$ sudo vi /boot/cmdline.txt

cgroup_enable=cpuset cgroup_memory=1 cgroup_enable=memory
Repeat these steps on the other 6 pi’s using the following host names:
- k8s-master-2.k8s.daveevans.us
- k8s-master-3.k8s.daveevans.us
- k8s-node-1.k8s.daveevans.us
- k8s-node-2.k8s.daveevans.us
- k8s-node-3.k8s.daveevans.us
- kubernetes.k8s.daveevans.us
After completing all the installations and configurations, my servers have the below names and IP addresses.
| Hostname | Public IP | Private IP |
|---|---|---|
| k8s-master-1.k8s.daveevans.us | 192.168.1.20 | 10.0.0.10 |
| k8s-master-2.k8s.daveevans.us | 192.168.1.21 | 10.0.0.11 |
| k8s-master-3.k8s.daveevans.us | 192.168.1.22 | 10.0.0.12 |
| k8s-node-1.k8s.daveevans.us | 192.168.1.23 | 10.0.0.13 |
| k8s-node-2.k8s.daveevans.us | 192.168.1.24 | 10.0.0.14 |
| k8s-node-3.k8s.daveevans.us | 192.168.1.25 | 10.0.0.15 |
| kubernetes.k8s.daveevans.us | 192.168.1.26 | 10.0.0.16 |